
For this project I used the fabric equivalent of just under 2 1/2 fat quarters --- in my case, I happened to have a $1.97 bundle of Disney princess fat quarters and mixed 'n matched since my niece is head-over-heels in love with all things princess. I cut half of the board strips from one FQ, half from another, about 4" for the border from a third, and backed the board with a fourth FQ cut to size. You can get away with two FQ's + some background strips for this checkerboard, if you like.
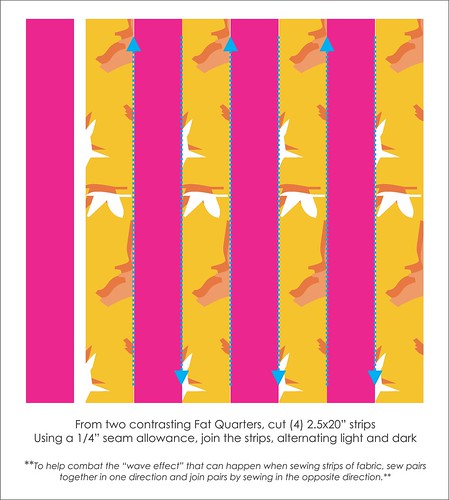
First things first --- square up your FQ to 18x20". You will need a total of {4} 2.5x20" light strips and {4} 2.5x20" dark strips. I used 2 strips of one fat quarter, 2 of another, and 4 strips of white I had on hand. The bottomline is, you need {8} strips total with a definite light/dark contrast.
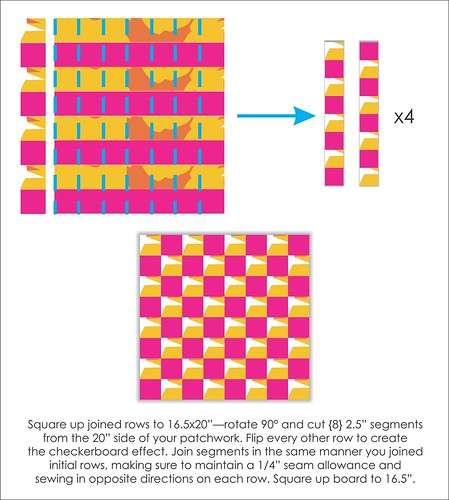
Pretty general stuff, right? Moving on...
At this juncture, I chose to cut to length 1.25" strips to create a border. You could skip the border and finish off your checkerboard in one of two ways: 1) the easy way or 2) the too-labor-intensive-way-for-1:30 AM sewists {read that: binding}. *grin*
I added my borders, squared up the top, cut a FQ to the size of the top + 1", and cut batting to the size of the backing + 1". My quilt sandwich started with the batting on the bottom, backing fabric right side up and centered, and was topped off with the checkerboard centered and right-side facing the backing. I pinned in the center, at 4 places about half-way between the center and edge, and then two pins along each edge...just to hold things in place.
Using a walking foot, stitch a scant 1/4" around the perimeter of the checkerboard, leaving a 3" opening on one of the sides. I clipped the seam allowance even with the edge of the checkerboard top {at the unsewn portion, only trim the batting even with the edge; I left a bit of extra backing to make it easier to get a clean edge once the board was right-side out} and clipped the corners. Turn the checkerboard right-side out through the opening, poke out the corners with something blunt {I use a chopstick!}, fold in the unsewn edge, and press. To finish off the checkerboard, stitch an 1/8th seam around the perimeter, catching the open edge, and stitch corner-to-corner on both diagonals to keep the batting from shifting.
Done. And done.
Because it was so {early} in the morning, I didn't get too far along the tracks when it came to playing pieces or a storage pouch ----- I had tunnel vision... *grin*
No comments:
Post a Comment