Showing posts with label Tutorial. Show all posts

Thursday, July 01, 2010

Tutorial: Quilted Checkerboard

NOTE: This is a bare-bones tutorial, and I'm lame and didn't photograph my finished checkerboard 'cause it was 1:30 in the morning!  *grin*

For this project I used the fabric equivalent of just under 2 1/2 fat quarters --- in my case, I happened to have a $1.97 bundle of Disney princess fat quarters and mixed 'n matched since my niece is head-over-heels in love with all things princess. I cut half of the board strips from one FQ, half from another, about 4" for the border from a third, and backed the board with a fourth FQ cut to size. You can get away with two FQ's + some background strips for this checkerboard, if you like.

First things first --- square up your FQ to 18x20". You will need a total of {4} 2.5x20" light strips and {4} 2.5x20" dark strips. I used 2 strips of one fat quarter, 2 of another, and 4 strips of white I had on hand. The bottomline is, you need {8} strips total with a definite light/dark contrast.
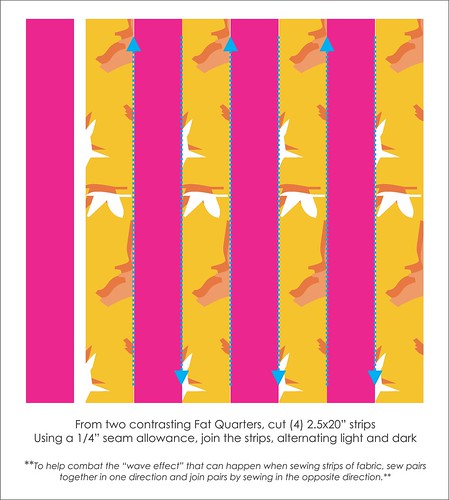
Checkerboard - Step 1

Pretty general stuff, right? Moving on...
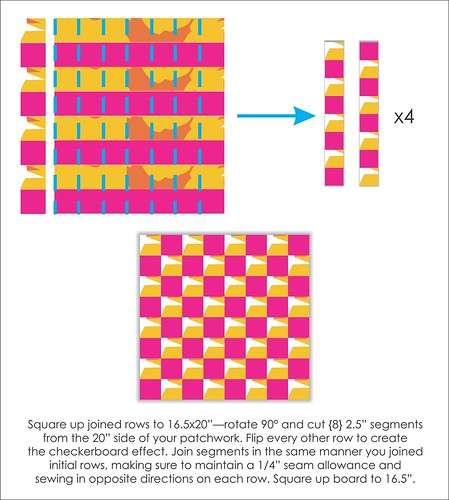
Checkerboard - Step 2

At this juncture, I chose to cut to length 1.25" strips to create a border. You could skip the border and finish off your checkerboard in one of two ways: 1) the easy way or 2) the too-labor-intensive-way-for-1:30 AM sewists {read that: binding}.  *grin* 

I added my borders, squared up the top, cut a FQ to the size of the top + 1", and cut batting to the size of the backing + 1". My quilt sandwich started with the batting on the bottom, backing fabric right side up and centered, and was topped off with the checkerboard centered and right-side facing the backing. I pinned in the center, at 4 places about half-way between the center and edge, and then two pins along each edge...just to hold things in place.

Using a walking foot, stitch a scant 1/4" around the perimeter of the checkerboard, leaving a 3" opening on one of the sides. I clipped the seam allowance even with the edge of the checkerboard top {at the unsewn portion, only trim the batting even with the edge; I left a bit of extra backing to make it easier to get a clean edge once the board was right-side out} and clipped the corners. Turn the checkerboard  right-side out through the opening, poke out the corners with something blunt {I use a chopstick!}, fold in the unsewn edge, and press. To finish off the checkerboard, stitch an 1/8th seam around the perimeter, catching the open edge, and stitch corner-to-corner on both diagonals to keep the batting from shifting.

Done. And done.

Because it was so {early} in the morning, I didn't get too far along the tracks when it came to playing pieces or a storage pouch ----- I had tunnel vision...  *grin*

Friday, January 08, 2010

Siggy Block Layouts...

...all told, when the Modern Siggy Swap is over I'll have 99 signature blocks from other quilters + the one I make. I played around today with several layouts. None of them yield a particularly large quilt {a 3" finished block will do that to you} but with borders and such I could go bigger if I wanted. The thought of quilting all those inches, though, is usually encouragement enough to keep it small. *grin* 

Here's what I came up with as layout possibilities:

1. "X Marks the Spot" -- 12 rows of 8 blocks + 1 "X" to piece into the back. Measures 24"x36" without borders.

2. "Circle the Wagons" -- 10 rows of 10. Measures 30" square.

3. "The Lost Sheep" -- 11 rows of 9 blocks = 99 sheep + 1 lost sheep for the back. Measures 27"x33" without borders. When putting this one together I ended up with an "odd duck." It reminded me of Jesus' parable of the lost sheep from Luke 15. A shepherd had 100 sheep and lost one. He left his other sheep safe in the fold and went in search of the one who had wandered away. When he found it, he hoisted it up on his shoulders and took it home with great joy. Jesus said God is the same --- there is MUCH rejoicing in heaven over a "lost sheep" who repents and is brought back to the fold.

4. "Fast Forward" -- 10 rows of 10; measures 30" square.


5. "Dizzy Squares" -- 10 rows of 10 blocks; 30" square. I saw a doll quilt by Darlene Zimmerman that is similar, and another take on All People Quilt that shares the broken lines quality.


6. "Zig Zags" -- 10 rows of 10; measures 30" square. Not a true zig-zag, but close enough.


7. "Centrifugal Force" -- 10 rows of 10; measures 30" square. One of the note-worthy moments in my driver's training was when my instructor endeavored to explain the difference between "centrifical" and centrifugal forces on a car. This, Uncle Bob of A++, is for you...and it's centriPETAL force, by the way.  *grin*

Wednesday, July 15, 2009

V is for Valerie...

...and [block] Victory, among other things! A couple friends and I are embarking upon a quilting adventure. We've formed a sewing group called "Sew Inclined" and want to make gift and donation quilts for folks in our area. Our first project is a 15-block sampler that we are making in memory of a dear lady from church. She passed away last year but not without leaving quite a legacy! We each have our own special memories of her, and wanted to honor her in a tangible way. We're giving the completed quilt to her daughter.

This is my first block for the quilt:

I can't say I was overly excited about the fabric when we put them together at the store. It sort of struck me as 80's throwback and, well, dusty. :o) I was pulling for a smattering of green, rust, tan, and turquoise blue -- but wouldn't you know, an independent voter tilted the balance. *Grin* So, since we're a group [and I dare say, want to stay friends], compromise is the key! We're going with 80's frump, but the blocks can be whatever style we want --- just have to be 12.5" unfinished. Cool, cool, cool! And, as long as I keep the larger floral blue away from the smaller, more dusty version I think I can handle these fabrics. *Grin*

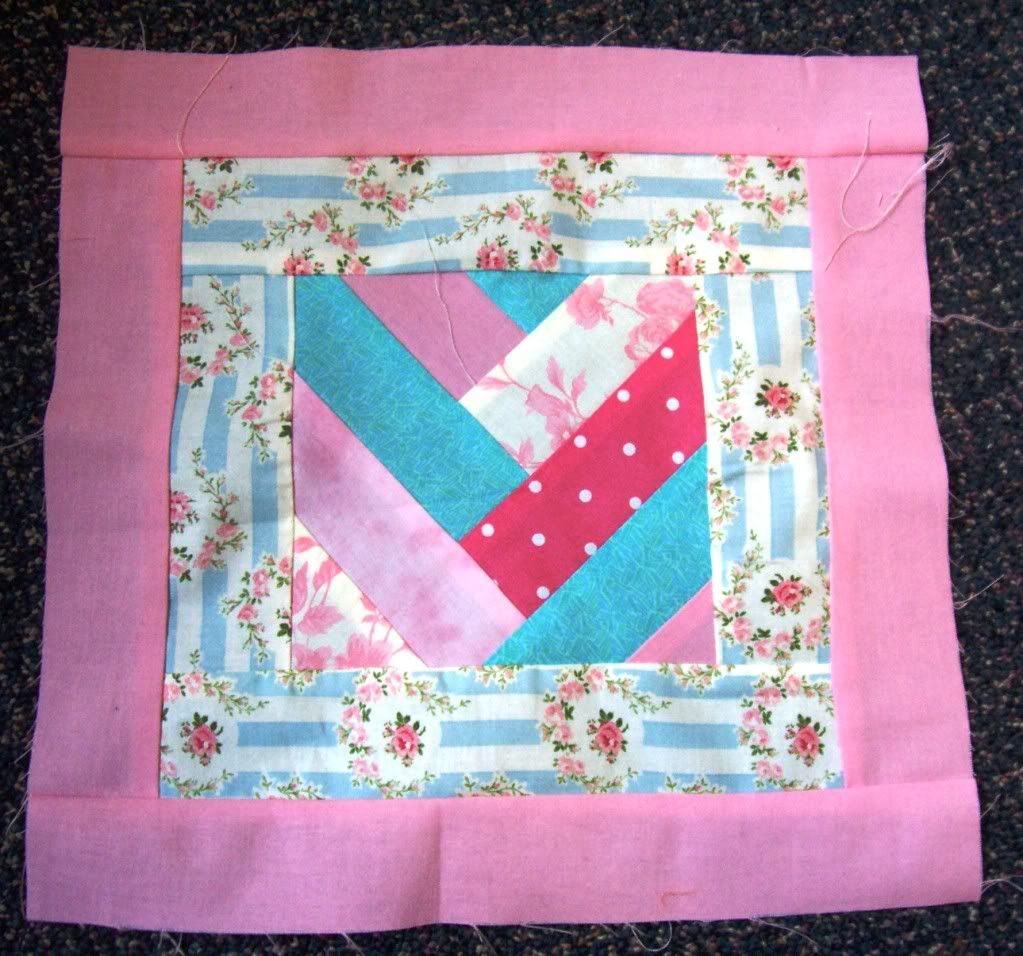
My inspiration came from a combination of sources. The April/May '09 edition of Quilt Magazine featured an appliqued cherry quilt with a braided border, designed by Karen DuMont. I didn't like the quilt, per se, but I loved the idea of "braiding" quilt fabric. I dog-eared the page and moved on... Then a couple weeks ago, I stumbled upon this quilting bee block posted by Katy at rippingoutseams (I sense a kindred spirit already...) Genius!

Dan helped me draft my own version of the block with his AutoCAD program (engineers are SO useful!) and size it for the dimensions of our quilt. I dutifully sat and listened to his explanation of the CAD program.......but, dear Dan, forgive me: my mind was on piecing the block! I may need a refresher course at a later date. I do see the potential of the CAD program for drafting quilting patterns. I just was too eager to begin sewing last night to grasp its myriad fine features. :o)

[Yes, that's my bathroom. Yes, that's tape. And yes, I taped my quilt block to the bathroom mirror....at 1:30 in the morning. It was the only place in the house I could think of with good lighting. I didn't feel the basement bulbs were showcasing all that glorious 80's color as well as they could be!]

I debated about creating a tutorial for this block, but really, it's not difficult and obviously the braiding technique is nothing new. Katy put together her own tutorial earlier this week, and Quilt magazine featured theirs in print ---- why waste the time re[drawing] the wheel? I also didn't snap pictures as I went 'cause I was too giddy trying to get the block done before dawn! But, for those who are interested, here are my cutting measurements (including a 1/4-inch seam allowance.)

For a 12" finished block

  1. Outside Ring = Cut two 12.5"x2" strips + two 9.5"x2" strips
  2. Inner Ring = Cut two 9.5"x2" strips + two 6.5"x2" strips
  3. For the Braid = Cut four 6.5"x2" strips each from three coordinating fabrics [12 strips total]. It helps to lay out the braid strips before you piece. I made sure there was one each of the coordinating fabrics in between repeats of any particular fabric. You'll sew the strips together, beginning at the top and working down, and then cut a 6.5" square from the resulting braid.

    **A note for the 1/4-inch seam challenged --- Dan assured me my strips need be no longer than 6.5" but I found I didn't have much wiggle room when it came to cutting my left/right sides down to 6.5". Maybe a quarter inch total and had I known that when sewing, I would've been really nervous! Go with 7" to be safe, unless you're a perfect seamer.

I have my next two blocks for the quilt planned out, but I don't know if I'm going to sew them immediately or not. Our group goal for the month was to have a single block completed by August 1st. We only picked out our fabric yesterday....I guess I'm a bit of an overachiever! *Grin*

Block #2 is a fancier pinwheel using three fabrics. Block #3 is a layout I saw in an advertisement for a quilt piece cutter thing. I don't remember what the product is called, but it sort of die-cuts fabric into a variety of shapes. One of the blocks featured had a center square set on point, then a scrappy border of triangles and parallelograms (so much fun to type, so much fun to say!), and finally bi-color triangles at each outside corner. Yes, yes, yes.....my faithful Dan --- he drafted both patterns for me. The CAD. ;o)

Sorry...no sneak peeks. You've already seen the fabric. It can only get better from here! :o)