
...and [block] Victory, among other things! A couple friends and I are embarking upon a quilting adventure. We've formed a sewing group called "Sew Inclined" and want to make gift and donation quilts for folks in our area. Our first project is a 15-block sampler that we are making in memory of a dear lady from church. She passed away last year but not without leaving quite a legacy! We each have our own special memories of her, and wanted to honor her in a tangible way. We're giving the completed quilt to her daughter.
This is my first block for the quilt: I can't say I was overly excited about the fabric when we put them together at the store. It sort of struck me as 80's throwback and, well, dusty. :o) I was pulling for a smattering of green, rust, tan, and turquoise blue -- but wouldn't you know, an independent voter tilted the balance. *Grin* So, since we're a group [and I dare say, want to stay friends], compromise is the key! We're going with 80's frump, but the blocks can be whatever style we want --- just have to be 12.5" unfinished. Cool, cool, cool! And, as long as I keep the larger floral blue away from the smaller, more dusty version I think I can handle these fabrics. *Grin*
My inspiration came from a combination of sources. The April/May '09 edition of Quilt Magazine featured an appliqued cherry quilt with a braided border, designed by Karen DuMont. I didn't like the quilt, per se, but I loved the idea of "braiding" quilt fabric. I dog-eared the page and moved on... Then a couple weeks ago, I stumbled upon this quilting bee block posted by Katy at rippingoutseams (I sense a kindred spirit already...) Genius!
Dan helped me draft my own version of the block with his AutoCAD program (engineers are SO useful!) and size it for the dimensions of our quilt. I dutifully sat and listened to his explanation of the CAD program.......but, dear Dan, forgive me: my mind was on piecing the block! I may need a refresher course at a later date. I do see the potential of the CAD program for drafting quilting patterns. I just was too eager to begin sewing last night to grasp its myriad fine features. :o)
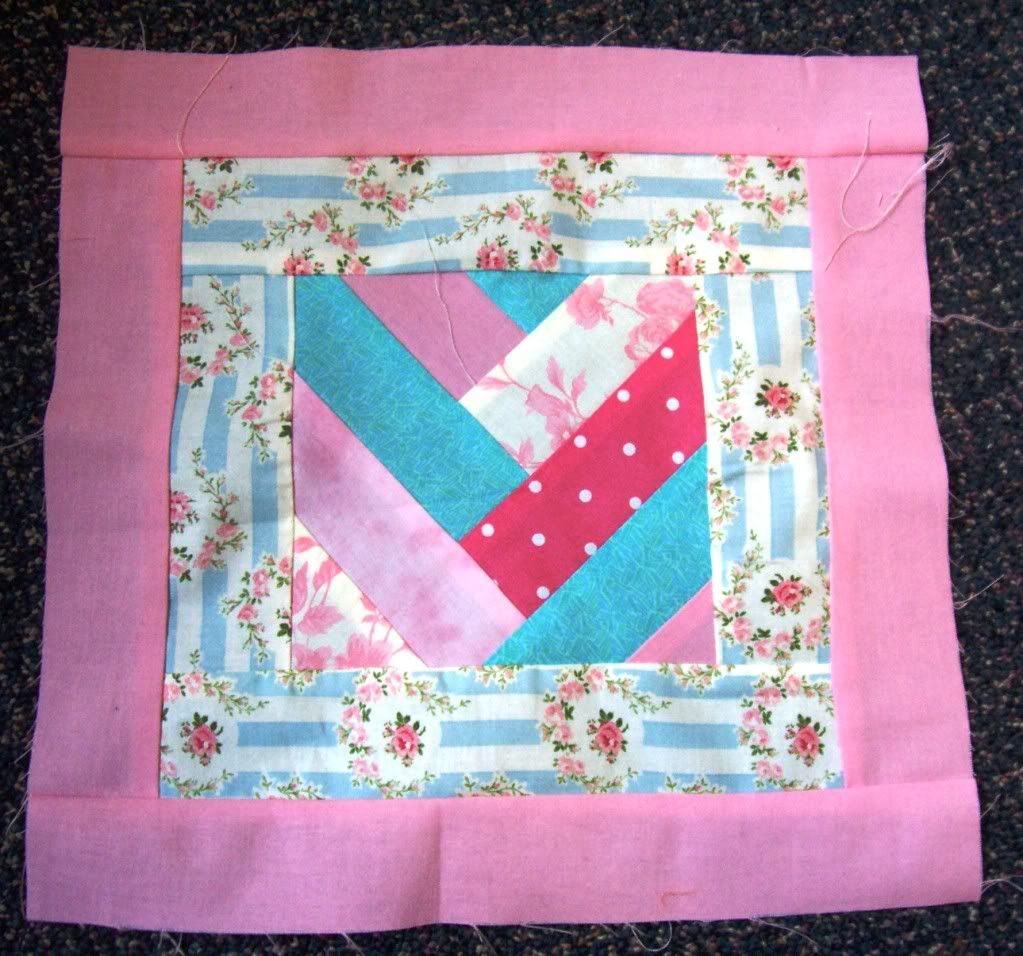
[Yes, that's my bathroom. Yes, that's tape. And yes, I taped my quilt block to the bathroom mirror....at 1:30 in the morning. It was the only place in the house I could think of with good lighting. I didn't feel the basement bulbs were showcasing all that glorious 80's color as well as they could be!]
I debated about creating a tutorial for this block, but really, it's not difficult and obviously the braiding technique is nothing new. Katy put together her own tutorial earlier this week, and Quilt magazine featured theirs in print ---- why waste the time re[drawing] the wheel? I also didn't snap pictures as I went 'cause I was too giddy trying to get the block done before dawn! But, for those who are interested, here are my cutting measurements (including a 1/4-inch seam allowance.)
For a 12" finished block
- Outside Ring = Cut two 12.5"x2" strips + two 9.5"x2" strips
- Inner Ring = Cut two 9.5"x2" strips + two 6.5"x2" strips
- For the Braid = Cut four 6.5"x2" strips each from three coordinating fabrics [12 strips total]. It helps to lay out the braid strips before you piece. I made sure there was one each of the coordinating fabrics in between repeats of any particular fabric. You'll sew the strips together, beginning at the top and working down, and then cut a 6.5" square from the resulting braid.
**A note for the 1/4-inch seam challenged --- Dan assured me my strips need be no longer than 6.5" but I found I didn't have much wiggle room when it came to cutting my left/right sides down to 6.5". Maybe a quarter inch total and had I known that when sewing, I would've been really nervous! Go with 7" to be safe, unless you're a perfect seamer.
I have my next two blocks for the quilt planned out, but I don't know if I'm going to sew them immediately or not. Our group goal for the month was to have a single block completed by August 1st. We only picked out our fabric yesterday....I guess I'm a bit of an overachiever! *Grin*
Block #2 is a fancier pinwheel using three fabrics. Block #3 is a layout I saw in an advertisement for a quilt piece cutter thing. I don't remember what the product is called, but it sort of die-cuts fabric into a variety of shapes. One of the blocks featured had a center square set on point, then a scrappy border of triangles and parallelograms (so much fun to type, so much fun to say!), and finally bi-color triangles at each outside corner. Yes, yes, yes.....my faithful Dan --- he drafted both patterns for me. The CAD. ;o)
Sorry...no sneak peeks. You've already seen the fabric. It can only get better from here! :o)
No comments:
Post a Comment